« Back to the Table of Contents
Blocks are a great resource on a Drupal site because they enable you to place random content almost anywhere.
Use blocks wisely. Because you can place them nearly anywhere and put nearly anything into them, you will want to confirm that you like the formatting that results from placing or moving a block.
This screenshot shows many of the default blocks on LibrarySite:

To add a block, go to Structure (in the black menu bar at the top) -> Block layout -> Add custom block. You can also go to the Custom block library (Structure -> Block layout -> Custom block library) to add a new custom block or edit an existing one. The Custom block library holds all the blocks that are not being requested by Drupal. Under Operations, you can edit, delete or develop a block. If you delete a block here, you aren't actually deleting it. You are hiding the block. When you create a menu, a block is created.
Edit an existing block
Existing blocks can be edited in various ways, including:
- Changing the content in the block;
- Changing the title of the block;
- Moving the block to a new location;
- Restricting access to a block based on user role;
- Restricting which paths (URLs) on which a block dislpays.
There are four kinds of blocks:
- Blocks created on the fly by a Module - the content of these blocks usually cannot be edited, but they can still be retitled or placed in different locations;
- Blocks created by a View - these blocks are usually lists of content, such as the list of Upcoming events on the home page, and the content of these blocks cannot be edited in the block configuration, though placement and title can;
- Blocks created by a Menu - in order to change the links that display in these blocks, you need to edit the Menu, not the block configuration, though title and placement can be edited in block configuration;
- Custom blocks - these blocks contain custom content and can be entirely edited in the block configuration.
To edit block configuration or the menu that creates a block, mouse over the block until you see a pencil icon appear in the upper right corner of the block.

Once this icon appears, click on it for a contextual menu, which shows you the editing options available to you for this particular block.

A custom block, module block or views block will simply show you one link: Configure block. When you click on this, you can edit the visibility.
A menu block will also let you edit the menu when you click Edit menu. See Edit the Menus (Navigation) for more information on working with Menus.
The block configuration page has useful help text that you will want to review when editing block configuration, including the Block title and description fields.
Only custom blocks will contain Body fields, and the content of these fields can be formatted the same way that you would format any other page. See Formatting Content for more details.
Region settings help you place the block in the area on the page where you want it to be visible. See below for more about understanding Regions.
Visibility settings will enable you to customize who sees the block, and what pages it is seen on.

Visibility Settings: Content type

Content type copy here

The pages settings enable you specify which URLs a block displays on or not. As with all fields on the node forms, the help text is your friend while you are getting used to the Drupal UI.
The wildcard (*) is a way to target multiple pages that start with the same URL. If you enter contact/*, you are telling the block to display on any page with a path that begins with contact/. This would include:
- contact/childrens-librarian
- contact/friends-of-library
- contact/specific-branch
- contact/anything-else
Notice that the / is part of the URL in the example above.
If you wanted the block to display on all pages that start with a particular path including the page with that particular path, then you would leave the / off of the end of the path and use the wildcard at the end of it (e.g. contact* would display the block on all of the examples above as well as the contact page itself).
Note the "All pages except those listed" and "Only the listed pages" radio buttons above the field where you enter display paths.
Visibility settings: Content Types
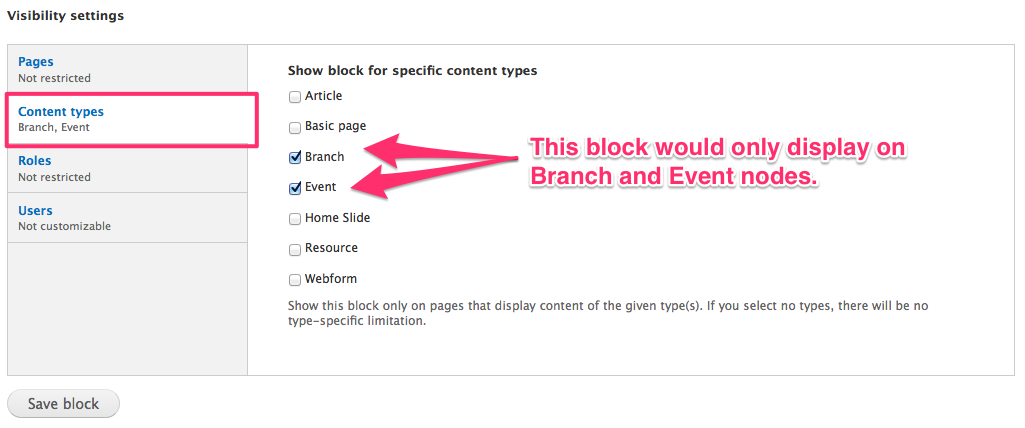
This pane enables you to set a block to only display on certain types of content. For example: a block showing a direct link to your catalog might be useful on Resource content.
Visibility Settings: Roles
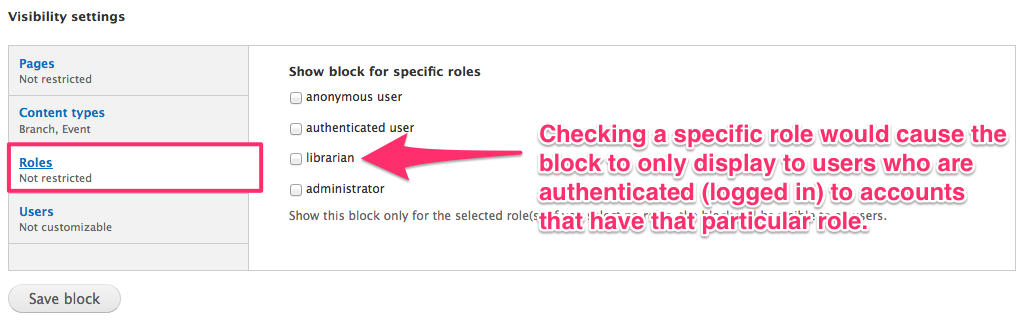
This is a great resource for offering helpful information to your content editors, as you can create informational blocks that only display for logged in users.
Anonymous user is anyone looking at your site who has not logged in with a username and password.
Authenticated user is anyone looking at your site who has logged in. They may also be a librarian or administrator, or both.
Regions
Regions are the areas on your site where things can be displayed. Librarysite comes with numerous regions by default, and their locations are visible in this screenshot:
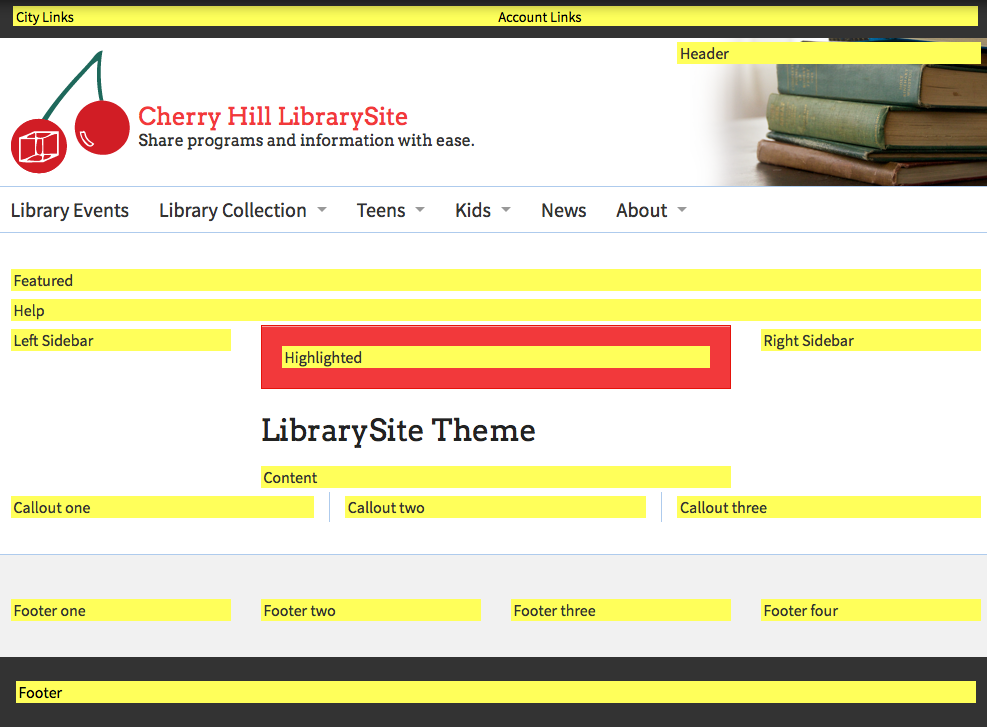
If a block is placed in a region, then the region will display that block in that region to the site visitor (while adhering to all other visibility settings for the block).
If no blocks exist in a particular region, then the region will not display at all. For example, the default LibrarySite setup does not use the Right Sidebar because a two column layout tends to be less cluttered and easier for users than a three column one. As such, the Right Sidebar will not render on most LibrarySite pages. If you place something into the Right Sidebar region, however, then that region will render, and the blocks will display in that location.
Default LibrarySite uses Callout one, Callout two and Callout three for the three columns on the home page. These columns will render on internal pages, as well, if blocks are placed into them.
To place a block into a region, you will use the grab handles or Region dropdown menu on the Blocks administration page:
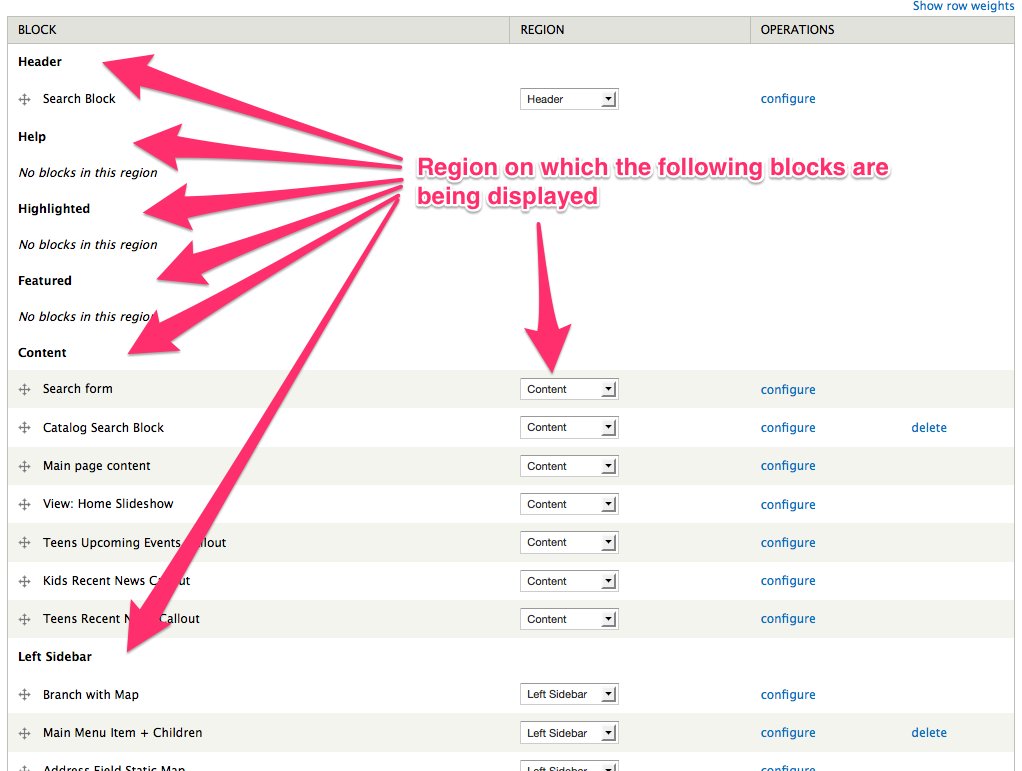
As with all administration pages where you can reorder elements, remember to save. Any order changes you make are temporary until you hit the Save button.